How to run a fully containerized and debuggable local development environment in Rubymine
14 July 2024
Being mainly a Java developer means that I suffer from some special needs whenever I occasionally switch to Ruby on Rails development for side projects. Mainly, what I can’t live without: a JetBrains IDE and line by line debugger with deep “Navigate to declaration” functionality. Meaning: if necessary I want to dive until I hit Ruby lang code while debugging.
The second thing I recently felt I needed is the ability to create an agnostic development environment. I want to be able to clone my repo and fire it up either in Linux/Windows/MacOS without too much hassle. In the future I want to be able to collaborate with people regardless of their OS and also in a setup that can skip the hell of going over Ruby installation. There’s even a successful cottage industry around this pain. And although I’m a happy customer of this solution, it’s still an issue if you want to collaborate with someone without a Mac.
The first nice surprise while researching on this topic is the appearance of rails-new. rails-new is an official solution provided by the Ruby on Rails team to generate a new Rails application without the need of installing Ruby on your machine. Neat. Once you go over the installation, you can run in the terminal something like:
rails-new myappBut the really big news in Rails is the support for devcontainers. Because creating a new app from scratch without having to install Ruby locally is nice, but being able to run the application with all its services (including DBs) in an containerized environment that matches the deployed one, then that’s spectacular. As of today, the rails-new command that will set you up and include devcontainer files into your project is:
rails-new --rails-version 7.2.0.beta2 myapp --devcontainerThe reason you need to specify a rails-version is that --devcontainer flag is introduced in rails:7.2.0 version and the current rails-new binary has default version set to rails:7.1.3 (here’s the Github issue). This will probably change in the near future.
Now your project will include a .devcontainer folder. Inside three files: devcontainer.json, Dockerfile, docker-compose.yml.
More often than not you will be wanting to add postgres container into the docker-compose.yml and with that skip the necessity of running the DB locally. So the final version of my docker-compose.yml would look like:
name: "sexy-dev-container-rails-example"

services:
  rails-app:
    build:
      context: ..
      dockerfile: .devcontainer/Dockerfile

    volumes:
    - ../..:/workspaces:cached
    command: sleep infinity

    networks:
    - default
    ports:
    - 45678:45678
    depends_on:
    - selenium
    - redis
    - postgres

  selenium:
    image: seleniarm/standalone-chromium
    restart: unless-stopped
    networks:
    - default

  redis:
    image: redis:7.2
    restart: unless-stopped
    networks:
    - default
    volumes:
    - redis-data:/data

  postgres:
    image: postgres:16
    restart: unless-stopped
    volumes:
      - postgres-data:/var/lib/postgresql/data
    environment:
      POSTGRES_USER: postgres
      POSTGRES_PASSWORD: postgres
    ports:
      - "5433:5432"

volumes:
  postgres-data:
  redis-data:
Notice that I set the PG ports to address 5432 to 5433. The reason for this is I normally like to keep the default port (5432) to run it locally if necessary (so not remotely through Docker, but actually installed on my machine.) It should work the same without specifying that.
Dockerfile only needs a small modification, we need to add a language encoding. By default Linux will use ASCII but more probable than not we will run into some issues while trying to run code with unicode chars. You can read more about this issue and its solution here.
# Make sure RUBY_VERSION matches the Ruby version in .ruby-version
ARG RUBY_VERSION=3.3.1
FROM ghcr.io/rails/devcontainer/images/ruby:$RUBY_VERSION
ENV LANG C.UTF-8
The devcontainer.json will end up something like:
{
  "name": "sexy-dev-container-rails-example",
  "dockerComposeFile": "compose.yaml",
  "service": "rails-app",
  "workspaceFolder": "/workspaces/${localWorkspaceFolderBasename}",

  "features": {
    "ghcr.io/devcontainers/features/github-cli:1": {},
    "ghcr.io/rails/devcontainer/features/activestorage": {},
    "ghcr.io/devcontainers/features/node:1": {},
    "ghcr.io/rails/devcontainer/features/postgres-client": {}
  },

  "containerEnv": {
    "CAPYBARA_SERVER_PORT": "45678",
    "SELENIUM_HOST": "selenium",
    "REDIS_URL": "redis://redis:6379/1",
    "DB_HOST": "postgres"
  },

  "forwardPorts": [3000, 5432, 6379],
  "postCreateCommand": "bin/setup"
}
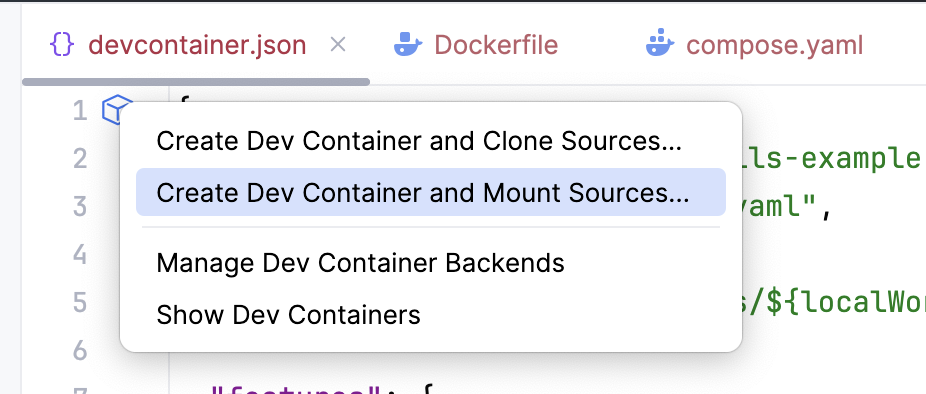
If you open devcontainer.json in a tab in Rubymine you should see now a cube icon in there:
![]()
Hit on Create dev container and Mount Sources:

This will open a dialog, install all what’s needed and end up opening up a Rubymine IDE Backend client. This is the Rubymine instance that will be running inside the Docker container of our Rails app.
You will probably be prompted to install the proper version of ruby set on the application:

After doing that the console will suggest you to run a rbenv global command to that installed version. Something like:
rbenv global 3.3.1Do that within the Rubymine terminal. After that you will probably need to close the client so it can automatically get the Ruby SDK. Close the client, go back to your original Rubymine window, on the devcontainer.json tab and then start it over again by hitting Show Dev Containers option:

Click on the name of your devcontainer and that will re-start the client. If you now get the prompt to run bundle install then it means the SDK has been configured.
If you hit debug, you will be as usual, prompted to install the proper debugging gem. Do that.
You can now add breakpoints and surf your way towards the metal.
Finally, if you want to add the Database data source locally, do it from your main Rubymine window (not the IDE Backend client), and remember to point to 5433 instead of 5432.
Here’s some more about devcontainers within Rubymine. Cheers!